
If you’re an Oreo lover, prepare to meet your new favorite dessert – Oreo Cheesecake Cake! This indulgent treat combines three irresistible layers: a creamy cheesecake center sandwiched between two rich chocolate cake layers, all topped with a luscious Oreo buttercream frosting. It’s the perfect balance of smooth, crunchy, and chocolatey goodness.
This show-stopping dessert isn’t just a crowd-pleaser—it’s a must-have for birthdays, holidays, or anytime you’re craving something extra special. Whether you’re celebrating a milestone or simply treating yourself, this homemade Oreo Cheesecake Cake outshines any store-bought version with its fresh ingredients and decadent taste.
The best part? It’s easier to make than you might think! Follow this simple, step-by-step recipe to create a dessert that’s as beautiful as it is delicious. Let’s dive into the sweet magic of making your own Oreo Cheesecake Cake!
🍰 What Is an Oreo Cheesecake Cake?
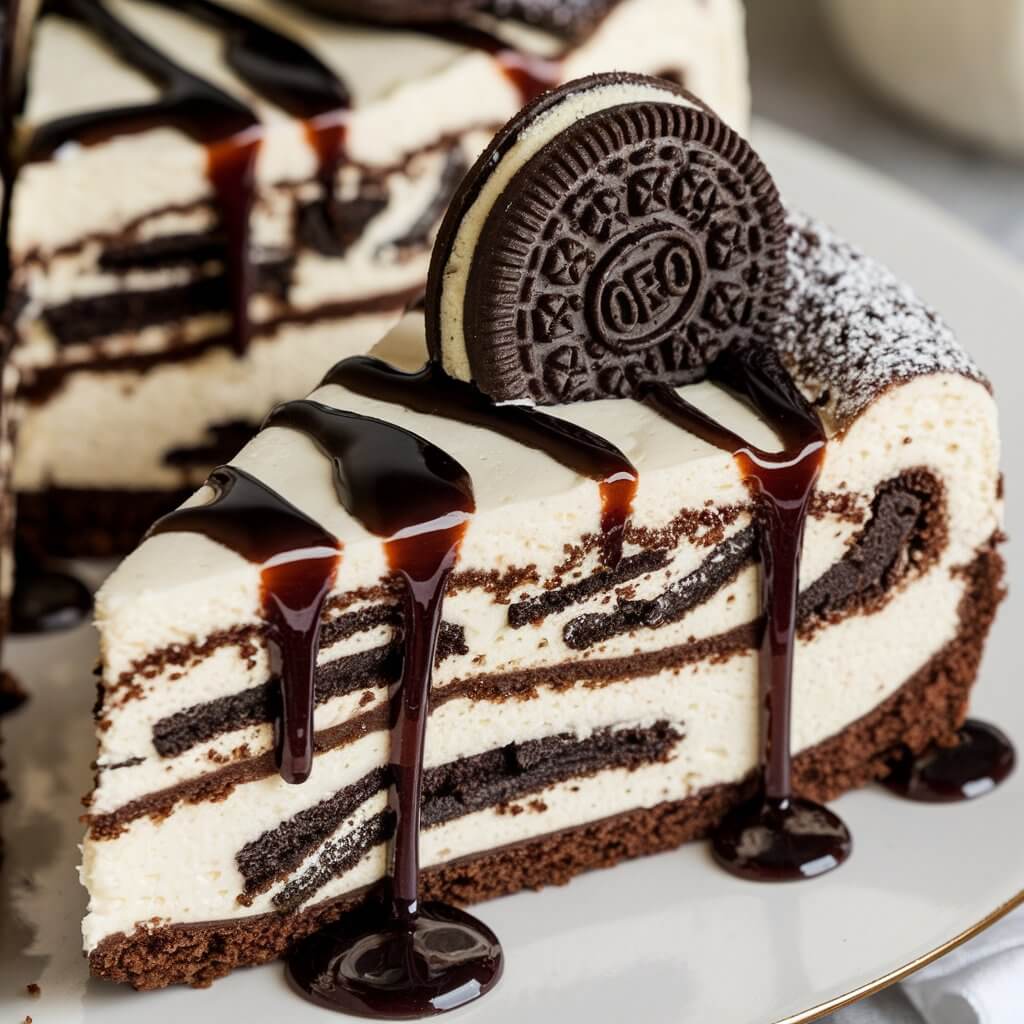
Oreo Cheesecake Cake is the ultimate dessert mashup that brings together two beloved treats—rich chocolate cake and creamy cheesecake—with the iconic crunch of Oreo cookies. Each bite delivers a perfect blend of textures and flavors, making it a standout dessert for any occasion.
The Irresistible Layers of Oreo Cheesecake Cake:
- Chocolate Cake Layers – Moist, fluffy, and packed with deep cocoa flavor, these layers form the perfect base and top for the cake.
- Cheesecake Layer – A smooth, velvety cheesecake sits in the middle, offering a creamy contrast to the chocolate cake.
- Oreo Cookie Crunch – Crushed Oreo cookies are sprinkled between layers and used as a decorative topping for added texture and a classic cookies-and-cream taste.
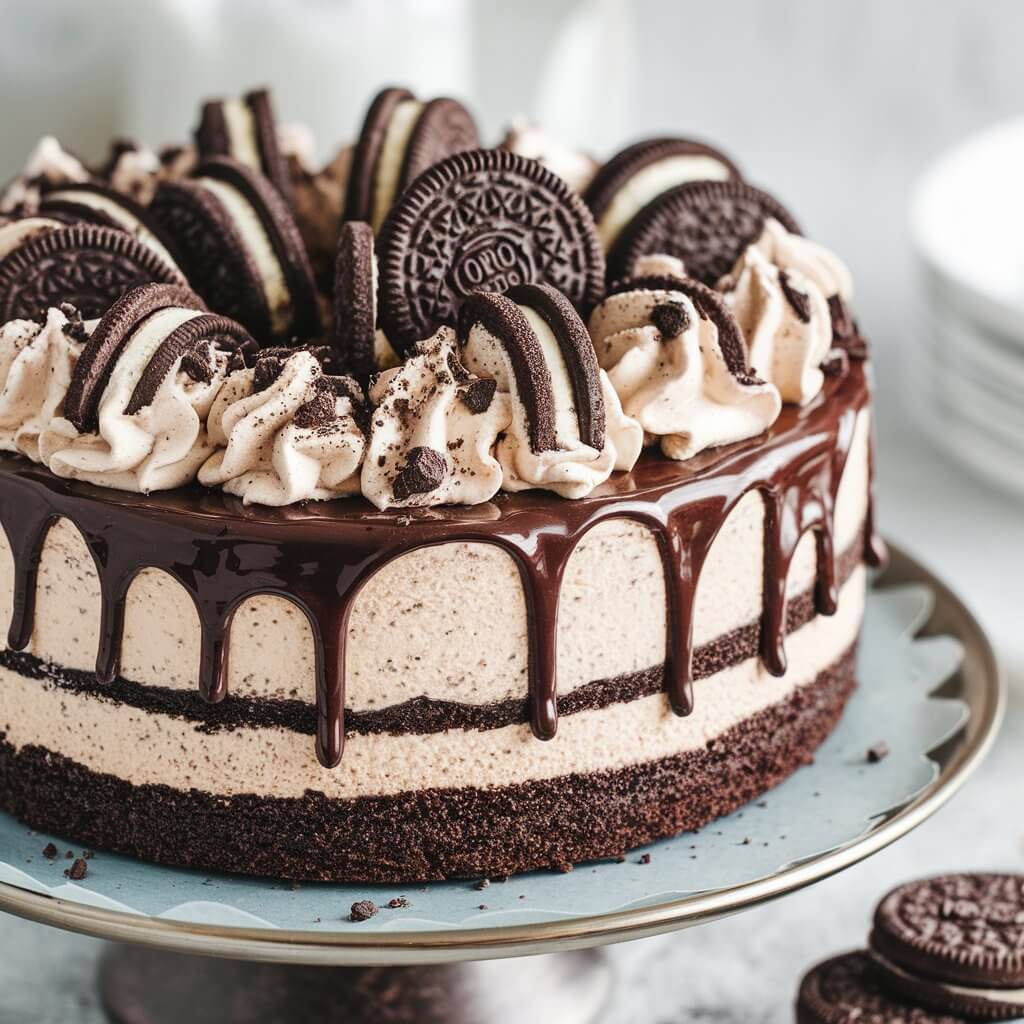
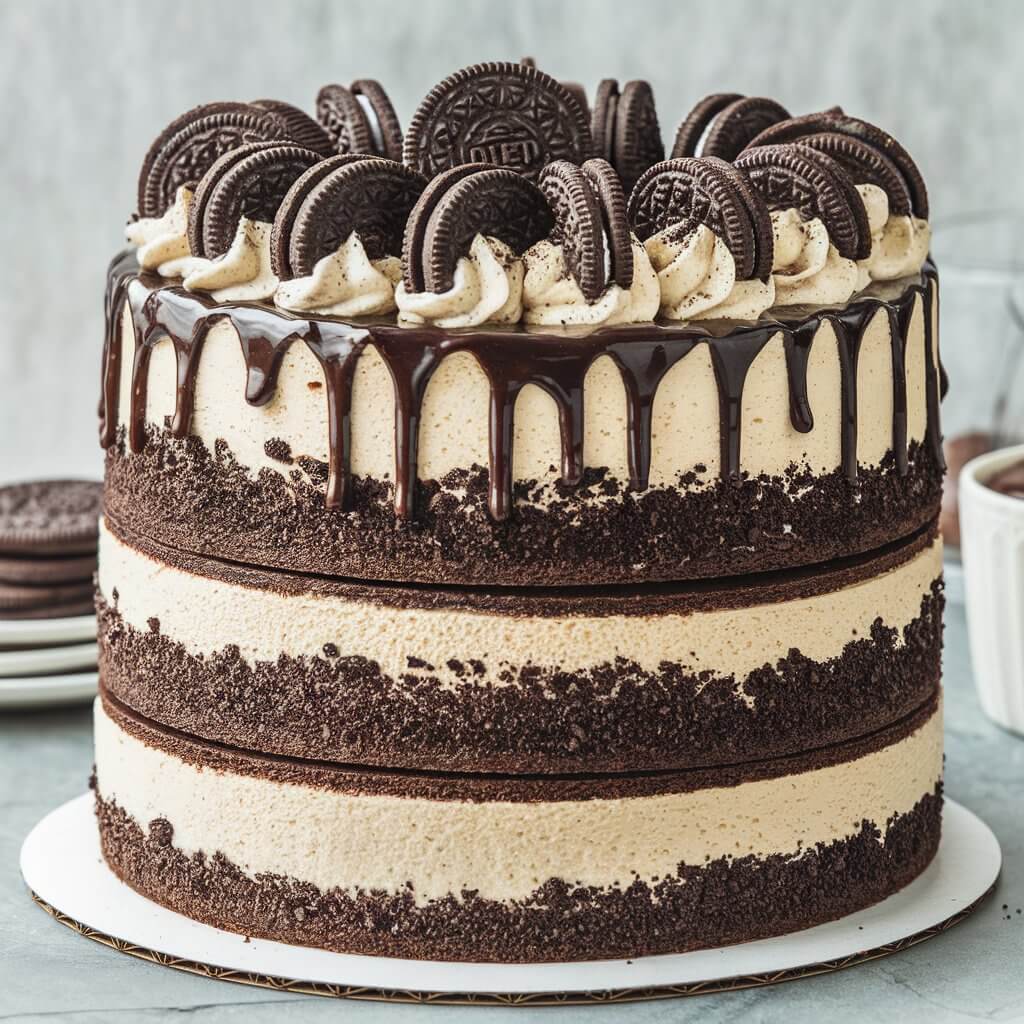
Why It’s a Showstopper Dessert:
This cake isn’t just delicious—it’s visually stunning. The triple-layered presentation with Oreo-studded frosting makes it a centerpiece-worthy dessert for:
- Birthday parties – A fun and indulgent treat everyone will love.
- Holidays and celebrations – Impress guests with a homemade masterpiece.
- Special occasions – Perfect for anniversaries, potlucks, or any dessert table.
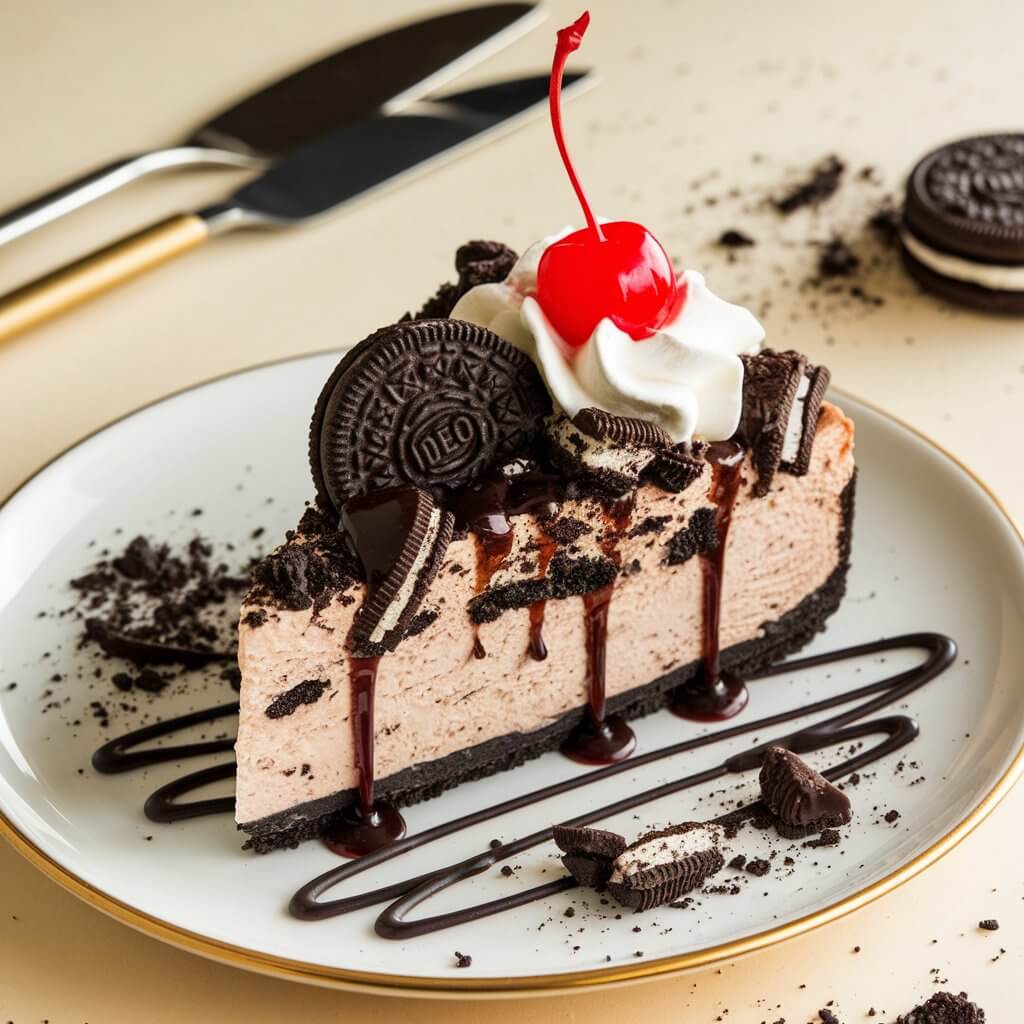
Classic vs. No-Bake Oreo Cheesecake Cake:
- Classic Version – Involves baking both the cheesecake and chocolate cake layers. It’s rich, dense, and offers a traditional homemade experience.
- No-Bake Version – Skips the oven for the cheesecake layer, using a chilled, creamy filling instead. It’s faster and ideal for warm weather or when you want a simpler preparation.
Whether you go for the classic or no-bake version, Oreo Cheesecake Cake guarantees a crowd-pleasing dessert that’s as fun to make as it is to eat!
🥣 Ingredients You’ll Need for Oreo Cheesecake Cake
Before you dive into making this decadent Oreo Cheesecake Cake, gather all the essential ingredients. This dessert is made up of three delicious parts—a creamy cheesecake layer, moist chocolate cake layers, and Oreo-studded frosting—each bringing rich flavors and textures to every bite.
1. Ingredients for the Cheesecake Layer:
- Cream Cheese – 16 oz (2 blocks), softened for a smooth texture
- Granulated Sugar – ¾ cup to sweeten the cheesecake
- Eggs – 2 large eggs for structure and creaminess
- Vanilla Extract – 1 teaspoon for a hint of warm flavor
- Crushed Oreos (Optional) – For an extra cookies-and-cream twist
2. Ingredients for the Chocolate Cake Layers:
- All-Purpose Flour – 1¾ cups for the cake’s base
- Cocoa Powder – ¾ cup for a rich chocolate flavor
- Granulated Sugar – 2 cups to add sweetness
- Baking Powder & Baking Soda – 1½ teaspoons of each for a light, fluffy texture
- Eggs – 2 large eggs to bind the ingredients
- Vegetable Oil – ½ cup for moisture
- Buttermilk – 1 cup for a tender crumb
- Hot Water – 1 cup to enhance the cocoa’s richness
- Vanilla Extract – 2 teaspoons for added flavor
3. Ingredients for the Oreo Frosting & Decoration:
- Unsalted Butter – 1 cup (2 sticks), softened for a creamy base
- Powdered Sugar – 4 cups for sweetness and structure
- Crushed Oreos – 1 cup (about 10 cookies) for that signature crunch
- Heavy Cream – 3-4 tablespoons to adjust frosting consistency
- Chocolate Ganache (Optional) – For a glossy drizzle over the cake
4. Suggested Tools for Baking Success:
- Springform Pan – Ideal for baking and easily releasing the cheesecake layer
- Mixing Bowls – For combining ingredients and keeping your process organized
- Electric Mixer (Handheld or Stand Mixer) – To blend batters and frostings smoothly
- Cake Turntable (Optional) – For easier assembly and decoration
With these ingredients and tools on hand, you’re ready to create a show-stopping Oreo Cheesecake Cake that will wow your family and friends!
👩🍳 Step-by-Step Guide to Make Oreo Cheesecake Cake

Ready to create a rich and indulgent Oreo Cheesecake Cake? Follow this easy, step-by-step guide to bake, assemble, and decorate your masterpiece. With a creamy cheesecake center, moist chocolate cake layers, and a luscious Oreo buttercream frosting, this dessert is sure to impress!
1. Bake the Cheesecake Layer
A smooth, creamy cheesecake layer is the heart of this cake. Here’s how to make it perfectly:
Ingredients:
- 16 oz (2 blocks) cream cheese, softened
- ¾ cup granulated sugar
- 2 large eggs
- 1 teaspoon vanilla extract
Instructions:
- Preheat & Prep: Preheat your oven to 325°F (163°C). Line a 9-inch springform pan with parchment paper and lightly grease the sides.
- Mix the Batter: In a large bowl, beat the softened cream cheese until smooth. Add sugar, eggs, and vanilla extract, mixing until combined and creamy.
- Bake the Cheesecake: Pour the batter into the prepared pan. Bake for 40-45 minutes, or until the edges are set and the center has a slight wobble.
- Cool & Chill: Let the cheesecake cool completely in the pan, then refrigerate for at least 4 hours (or overnight) for best results.
💡 Pro Tips for a Crack-Free Cheesecake:
- Avoid overmixing the batter to prevent air bubbles.
- Use a water bath (wrap your springform pan in foil and place it in a larger pan with hot water) for even baking.
- Let the cheesecake cool gradually to avoid cracks.
2. Prepare the Chocolate Cake Layers
These moist, rich chocolate layers perfectly complement the creamy cheesecake.
Ingredients:
- 1¾ cups all-purpose flour
- ¾ cup cocoa powder
- 2 cups granulated sugar
- 1½ teaspoons baking powder
- 1½ teaspoons baking soda
- 2 large eggs
- ½ cup vegetable oil
- 1 cup buttermilk
- 1 cup hot water
- 2 teaspoons vanilla extract
Instructions:
- Preheat Oven: Set your oven to 350°F (175°C). Grease and line two 9-inch round cake pans with parchment paper.
- Mix Dry Ingredients: In a large bowl, whisk together flour, cocoa powder, sugar, baking powder, and baking soda.
- Add Wet Ingredients: Stir in eggs, vegetable oil, buttermilk, and vanilla extract. Gradually pour in hot water, mixing until smooth. (The batter will be thin—this is normal.)
- Bake the Cakes: Divide the batter evenly between the pans. Bake for 30-35 minutes, or until a toothpick inserted in the center comes out clean.
- Cool the Cakes: Let the cakes cool in the pans for 10 minutes, then transfer them to a wire rack to cool completely.
3. Assemble the Layers
Now it’s time to stack the cheesecake between the chocolate cake layers!
Step-by-Step Assembly:
- Level the Cakes (Optional): If your chocolate cakes domed while baking, use a serrated knife to trim the tops for even layers.
- Layer 1: Place one chocolate cake layer on a serving plate or cake board.
- Add the Cheesecake: Carefully remove the cheesecake from the springform pan and place it on top of the first chocolate cake layer.
- Layer 2: Add the second chocolate cake layer on top of the cheesecake.
💡 Pro Tip: For easy handling, freeze the cheesecake for 30 minutes before assembling to keep it firm.
4. Frost and Decorate
A creamy Oreo buttercream and optional ganache drizzle bring this cake to the next level.
Oreo Buttercream Ingredients:
- 1 cup unsalted butter, softened
- 4 cups powdered sugar
- 1 cup crushed Oreos (about 10 cookies)
- 3-4 tablespoons heavy cream
- 1 teaspoon vanilla extract
Instructions:
- Make the Frosting: Beat butter until smooth. Gradually add powdered sugar, then mix in vanilla extract and heavy cream until fluffy. Fold in crushed Oreos.
- Frost the Cake: Spread a thin layer of frosting (crumb coat) over the cake and chill for 15 minutes. Apply a final smooth layer of Oreo buttercream.
- Decorate: Press crushed Oreos around the bottom edge or top of the cake.
Optional Chocolate Ganache:
- ½ cup heavy cream
- 1 cup semi-sweet chocolate chips
To Make Ganache: Heat heavy cream until steaming (not boiling), pour over chocolate chips, and stir until smooth. Let it cool slightly before drizzling over the cake.
With your Oreo Cheesecake Cake beautifully assembled and frosted, it’s time to slice, serve, and enjoy this decadent dessert!
📌 Expert Tips for the Perfect Oreo Cheesecake Cake
Creating the perfect Oreo Cheesecake Cake is easier when you know a few expert tricks. From achieving smooth layers to storing leftovers, these tips will help you master this indulgent dessert while avoiding common pitfalls.
🧊 1. Cooling and Chilling: Why Resting Time Improves Texture
Proper cooling and chilling are essential for the best texture and flavor:
- Cheesecake Layer: After baking, allow the cheesecake to cool at room temperature for 1 hour before chilling in the refrigerator for at least 4 hours (or overnight). This slow cooling prevents cracks and ensures a firm, creamy texture.
- Chocolate Cake Layers: Let the cake layers cool completely on a wire rack before assembling. Warm cake can melt the frosting and make stacking difficult.
- Chill Before Slicing: After frosting the cake, refrigerate it for 30-60 minutes to set the layers, making it easier to cut clean slices.
📏 2. Layering Tips: Ensuring Even Layers for a Professional Loo
Achieve bakery-worthy layers with these simple techniques:
- Level the Cake Layers: If your chocolate cakes have a domed top, use a serrated knife to trim the tops for flat, even layers.
- Freeze the Cheesecake: For easier handling, freeze the cheesecake for 30 minutes before assembling. This keeps it firm and prevents breakage.
- Use a Cake Board: Assemble the cake on a sturdy cake board or serving plate for stability while frosting and transporting.
- Apply a Crumb Coat: Spread a thin layer of frosting (crumb coat) over the entire cake, then chill for 15 minutes before applying the final coat for a clean finish.
🧺 3. Storage & Freezing: How to Keep It Fresh or Freeze for Later
Keep your Oreo Cheesecake Cake tasting fresh with these storage methods:
- Refrigeration: Store the cake in an airtight container in the refrigerator for up to 5 days. Let it sit at room temperature for 10-15 minutes before serving for the best flavor.
- Freezing (Whole Cake): Wrap the fully assembled cake tightly in plastic wrap and then aluminum foil. Freeze for up to 2 months. Thaw in the refrigerator overnight before serving.
- Freezing (Individual Slices): Wrap each slice in plastic wrap and place them in a freezer-safe container. This allows you to enjoy a slice whenever you crave it!
⚠️ 4. Common Mistakes to Avoid: Preventing Cracks, Dryness, or Soggy Layers
Avoid these common pitfalls to ensure a perfect cake every time:
- Overmixing the Cheesecake Batter: This can cause air bubbles and cracks—mix just until smooth and combined.
- Skipping the Cooling Process: Rushing the cooling step can lead to a runny cheesecake or crumbly cake layers.
- Using Warm Layers: Always cool or chill your cake and cheesecake layers before assembling to prevent slipping or uneven layers.
- Soggy Layers: Avoid excess moisture by thoroughly cooling the cheesecake and patting it dry if condensation forms during chilling.
By following these expert tips, you’ll have a perfectly layered, rich, and creamy Oreo Cheesecake Cake that’s as stunning as it is delicious!
❓ Frequently Asked Questions (FAQs)
Here are answers to some common questions to help you master the Oreo Cheesecake Cake and make the baking process even easier!
1. Can I Make Oreo Cheesecake Cake Ahead of Time?
Yes! This cake is perfect for making in advance. Here’s how:
- Cheesecake Layer: Prepare the cheesecake up to 2 days ahead. Store it covered in the refrigerator until ready to assemble.
- Chocolate Cake Layers: Bake the cake layers 1-2 days in advance. Wrap them tightly in plastic wrap and store them at room temperature or refrigerate for freshness.
- Fully Assembled Cake: Once assembled and frosted, the cake can be refrigerated for up to 24 hours before serving for the best texture and flavor.
2. What’s the Best Way to Store Leftover Oreo Cheesecake Cake?
Proper storage keeps your cake fresh and delicious:
- Refrigerate: Store leftover cake in an airtight container in the refrigerator for 3-5 days.
- Freeze: For longer storage, wrap the cake (or individual slices) in plastic wrap and a layer of aluminum foil. Freeze for up to 2 months and thaw overnight in the refrigerator before serving.
- Serving Tip: Let refrigerated cake sit at room temperature for 10-15 minutes to soften before serving.
3. Can I Use Boxed Cake Mix for the Chocolate Layer?
Absolutely! Using a boxed chocolate cake mix is a convenient shortcut. Here’s how to do it:
- Choose a Rich Flavor: Opt for a devil’s food or chocolate fudge cake mix for the best taste.
- Follow Package Instructions: Prepare the cake mix as directed on the box using 9-inch round cake pans.
- Enhance the Flavor: For a homemade touch, replace water with milk and add an extra teaspoon of vanilla extract.
4. How Do I Make a No-Bake Oreo Cheesecake Cake?
If you want to skip the oven for the cheesecake layer, try this no-bake version:
Ingredients for No-Bake Cheesecake Layer:
- 16 oz (2 blocks) cream cheese, softened
- 1 cup powdered sugar
- 1½ cups whipped cream (or whipped topping)
- 1 teaspoon vanilla extract
- 1 cup crushed Oreos
Instructions:
- Prepare the Filling: Beat cream cheese, powdered sugar, and vanilla extract until smooth. Gently fold in whipped cream and crushed Oreos.
- Chill the Layer: Spread the mixture into a 9-inch springform pan, smooth the top, and refrigerate for 4 hours (or overnight) to set.
- Assemble the Cake: Layer the no-bake cheesecake between two chocolate cake layers and proceed with frosting and decoration.
These FAQs cover everything you need to know to make, store, and customize your Oreo Cheesecake Cake—so you can bake with confidence and enjoy every bite!
Making an Oreo Cheesecake Cake at home is not only easy but incredibly rewarding. With its rich chocolate cake layers, creamy cheesecake center, and indulgent Oreo frosting, this dessert is a true showstopper that’s perfect for any celebration—or simply treating yourself!
By following the step-by-step guide and expert tips, you’ll be able to create a bakery-worthy cake that’s sure to impress family and friends. Plus, the joy of homemade baking means you can customize every layer to your taste.
Now it’s your turn! Give this irresistible Oreo Cheesecake Cake recipe a try and experience the magic yourself.
👉 We’d love to hear from you! Share your baking experience in the comments below—did you try any fun variations? If you enjoyed this recipe, don’t forget to share this post with your fellow dessert lovers! Happy baking! 🍰
Your feedback helps us grow – drop a comment ❤️
There are no reviews yet. Be the first one to write one.
2 thoughts on “Oreo Cheesecake Cake: How to Make This Irresistible Treat”